
Your team is about to launch your latest mobile app, which means it’s time to start your quality assurance process. While the client loves the design you’ve worked on for months, you still need to test it thoroughly before it’s live. So you ask your team to begin pushing the software and looking for bugs. Maybe you even ask the clients and a select group of beta users to play with the software.
The problem? There’s too much going on, in too many places. Slack, Asana, emails, texts, group chats…important issues are getting lost in the shuffle. This drags out your testing time and ensures that you’ll miss quite a few bugs. The upset in communication and delays doesn’t just throw you off, either. Your client isn’t happy, and your team is confused.
Quality Assurance (QA) is a simple process. But when you have many different voices, it can get complicated fast.
What exactly is quality assurance?
QA is the process or procedure that your developers follow to ensure that your product is the best it could be. Generally, this means that your QA team will be focusing on bugs, issues, and fixing other feedback offered by your team and your clients.
QA also tends to include rigorous testing and a seemingly never-ending cascade of tasks. Despite the fact that QA is a relatively simple concept, it’s easy to go off track.
Here are our top 7 tips on keeping your QA process effective and streamlined in 2020.
1. Get organized
First things first: It’s time to get organized. Before you do anything, it’s critical to make a checklist that contains all information that could be critical for a QA assessment. This includes who is involved, what libraries the project is built on, the ideal user, which tests you’ll want to run, and key dates.
Vivek Chopra, Head of Engineering at Very Good Security, says that writing their tests comes first in the development process. “If you treat QA as the end of your process, it’s easy to see testing as expensive and time-consuming. But if you write your tests first and design your product from that criteria, you’re actually moving faster and you’ll build an app that works.”
2. Start early in the development process
Don’t start QA after everything is finished as an afterthought. As mentioned above, it’s best to plan your tests in the beginning and develop your product with these tests in mind.
You should also consider creating comments and feedback as you progress in the project. For ideal efficiency, you may want to split your project into modules or parts. You can begin testing each part as you finish it.
3. Build-in elements
There are six principles to a solid website, app, or general product:
- Usability
- Efficiency
- Portability
- Maintainability
- Reliability
- Functionality
It’s important to bake them into your QA process and use them as guidelines to improve your final product. How intuitive is your interface? Can it integrate easily with other apps? How difficult will it be to maintain? Ask yourself these questions at every step of the process to ensure that you minimize feedback and bugs, and accelerate the launch process.
Another major factor outside of these six elements is security, especially if you plan to regularly update your product. If your application will be handling personal or sensitive data, this is especially important. Kathy Wang, CISO at Very Good Security as well as a startup advisor and investor, recommends that startups should test against pre-set benchmarks. “With each product release, you should be running your code against your benchmarks in a consistent process and making improvements against vulnerabilities,” says Wang.
4. Shift left, shift right
More likely than not, you’re not going to have a full QA team. If you’re a startup or small business, your engineers and developers may also be carrying out your quality assurance tests. To make things easier, you’ll want to “shift left” and “shift right.”
“Shifting left” equates to starting early in your testing process. You shift left when you design your tests at the beginning of your development process and focus on preventing bugs.
When you “shift right,” you put your energies into fixing bugs and issues post-production. You can employ strategies here like testing your final product with a small portion of users.
5. Choose an efficient communication program
Github comments are great. But they can get lost easily, especially when you throw emails and instant messages into the mix. Consider investing in a program to help you manage your work tickets. Typically, you can also assign tasks and review your overall progress. This keeps things organized and prevents bottlenecks.
Matt Washburn, VP of Operations at Simple Focus, is well-acquainted with the struggle of keeping communication clear between multiple parties. He shared that introducing a dedicated communication platform was a game-changer for his team., “Before Sifter, everything was disorganized,” he says. “ The big value for us was that moving to a detailed tracking software allowed us to stay disciplined and keep our eye on resolving the issues as quickly as possible.”
With teams going remote, this becomes an especially attractive option. When tasks are neatly listed and assigned, you don’t need to worry about asynchronous schedules.
6. Be clear and be comprehensive in your notes
Each ticket should be written as clearly and comprehensively as possible, with plenty of context. Be sure to list the following:
- The bug or issue
- The URL
- The file name
- Which browser or device you used.
You may also want to include screenshots and other documentation.
Clear communication and a consistent process to ensure high-quality releases is critical for cloud-based products. Wang says, “A common mistake we find is that after a bug is fixed in a quick patch, this update is often lost in the next release and the vulnerability returns.”
Keeping detailed documentation can help you prevent such common pitfalls. Consider these examples shown in Sifter’s bug and issue tracking software:
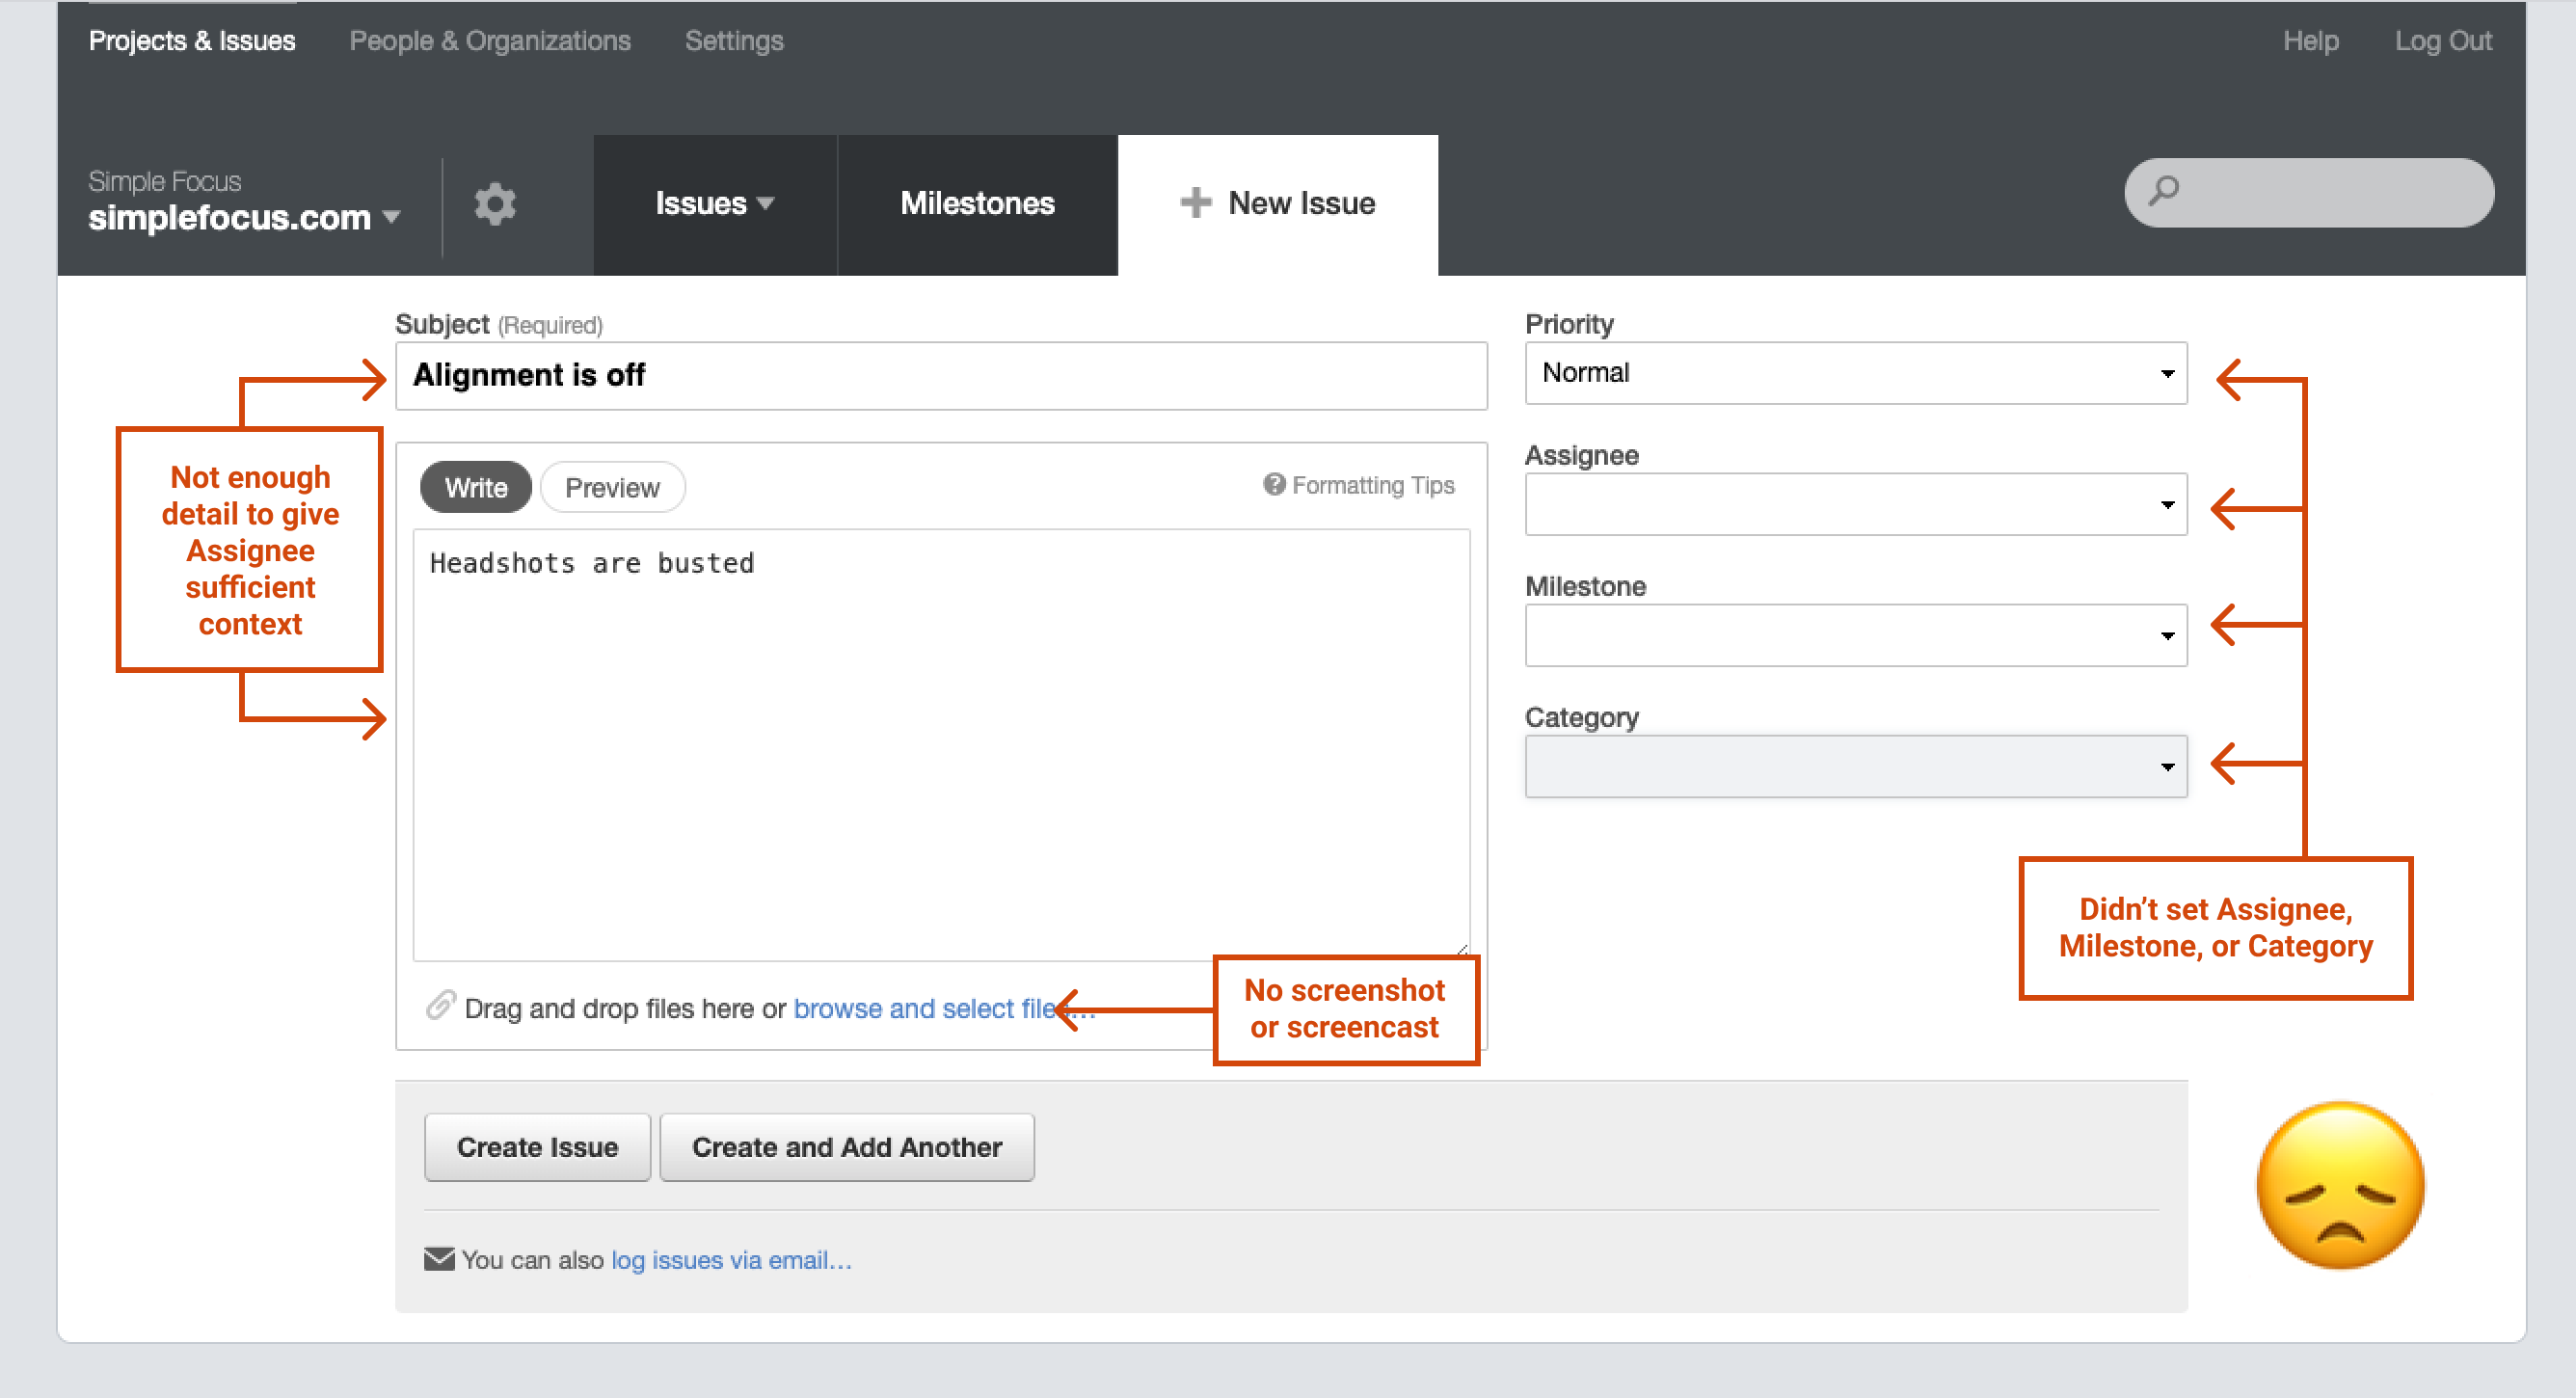
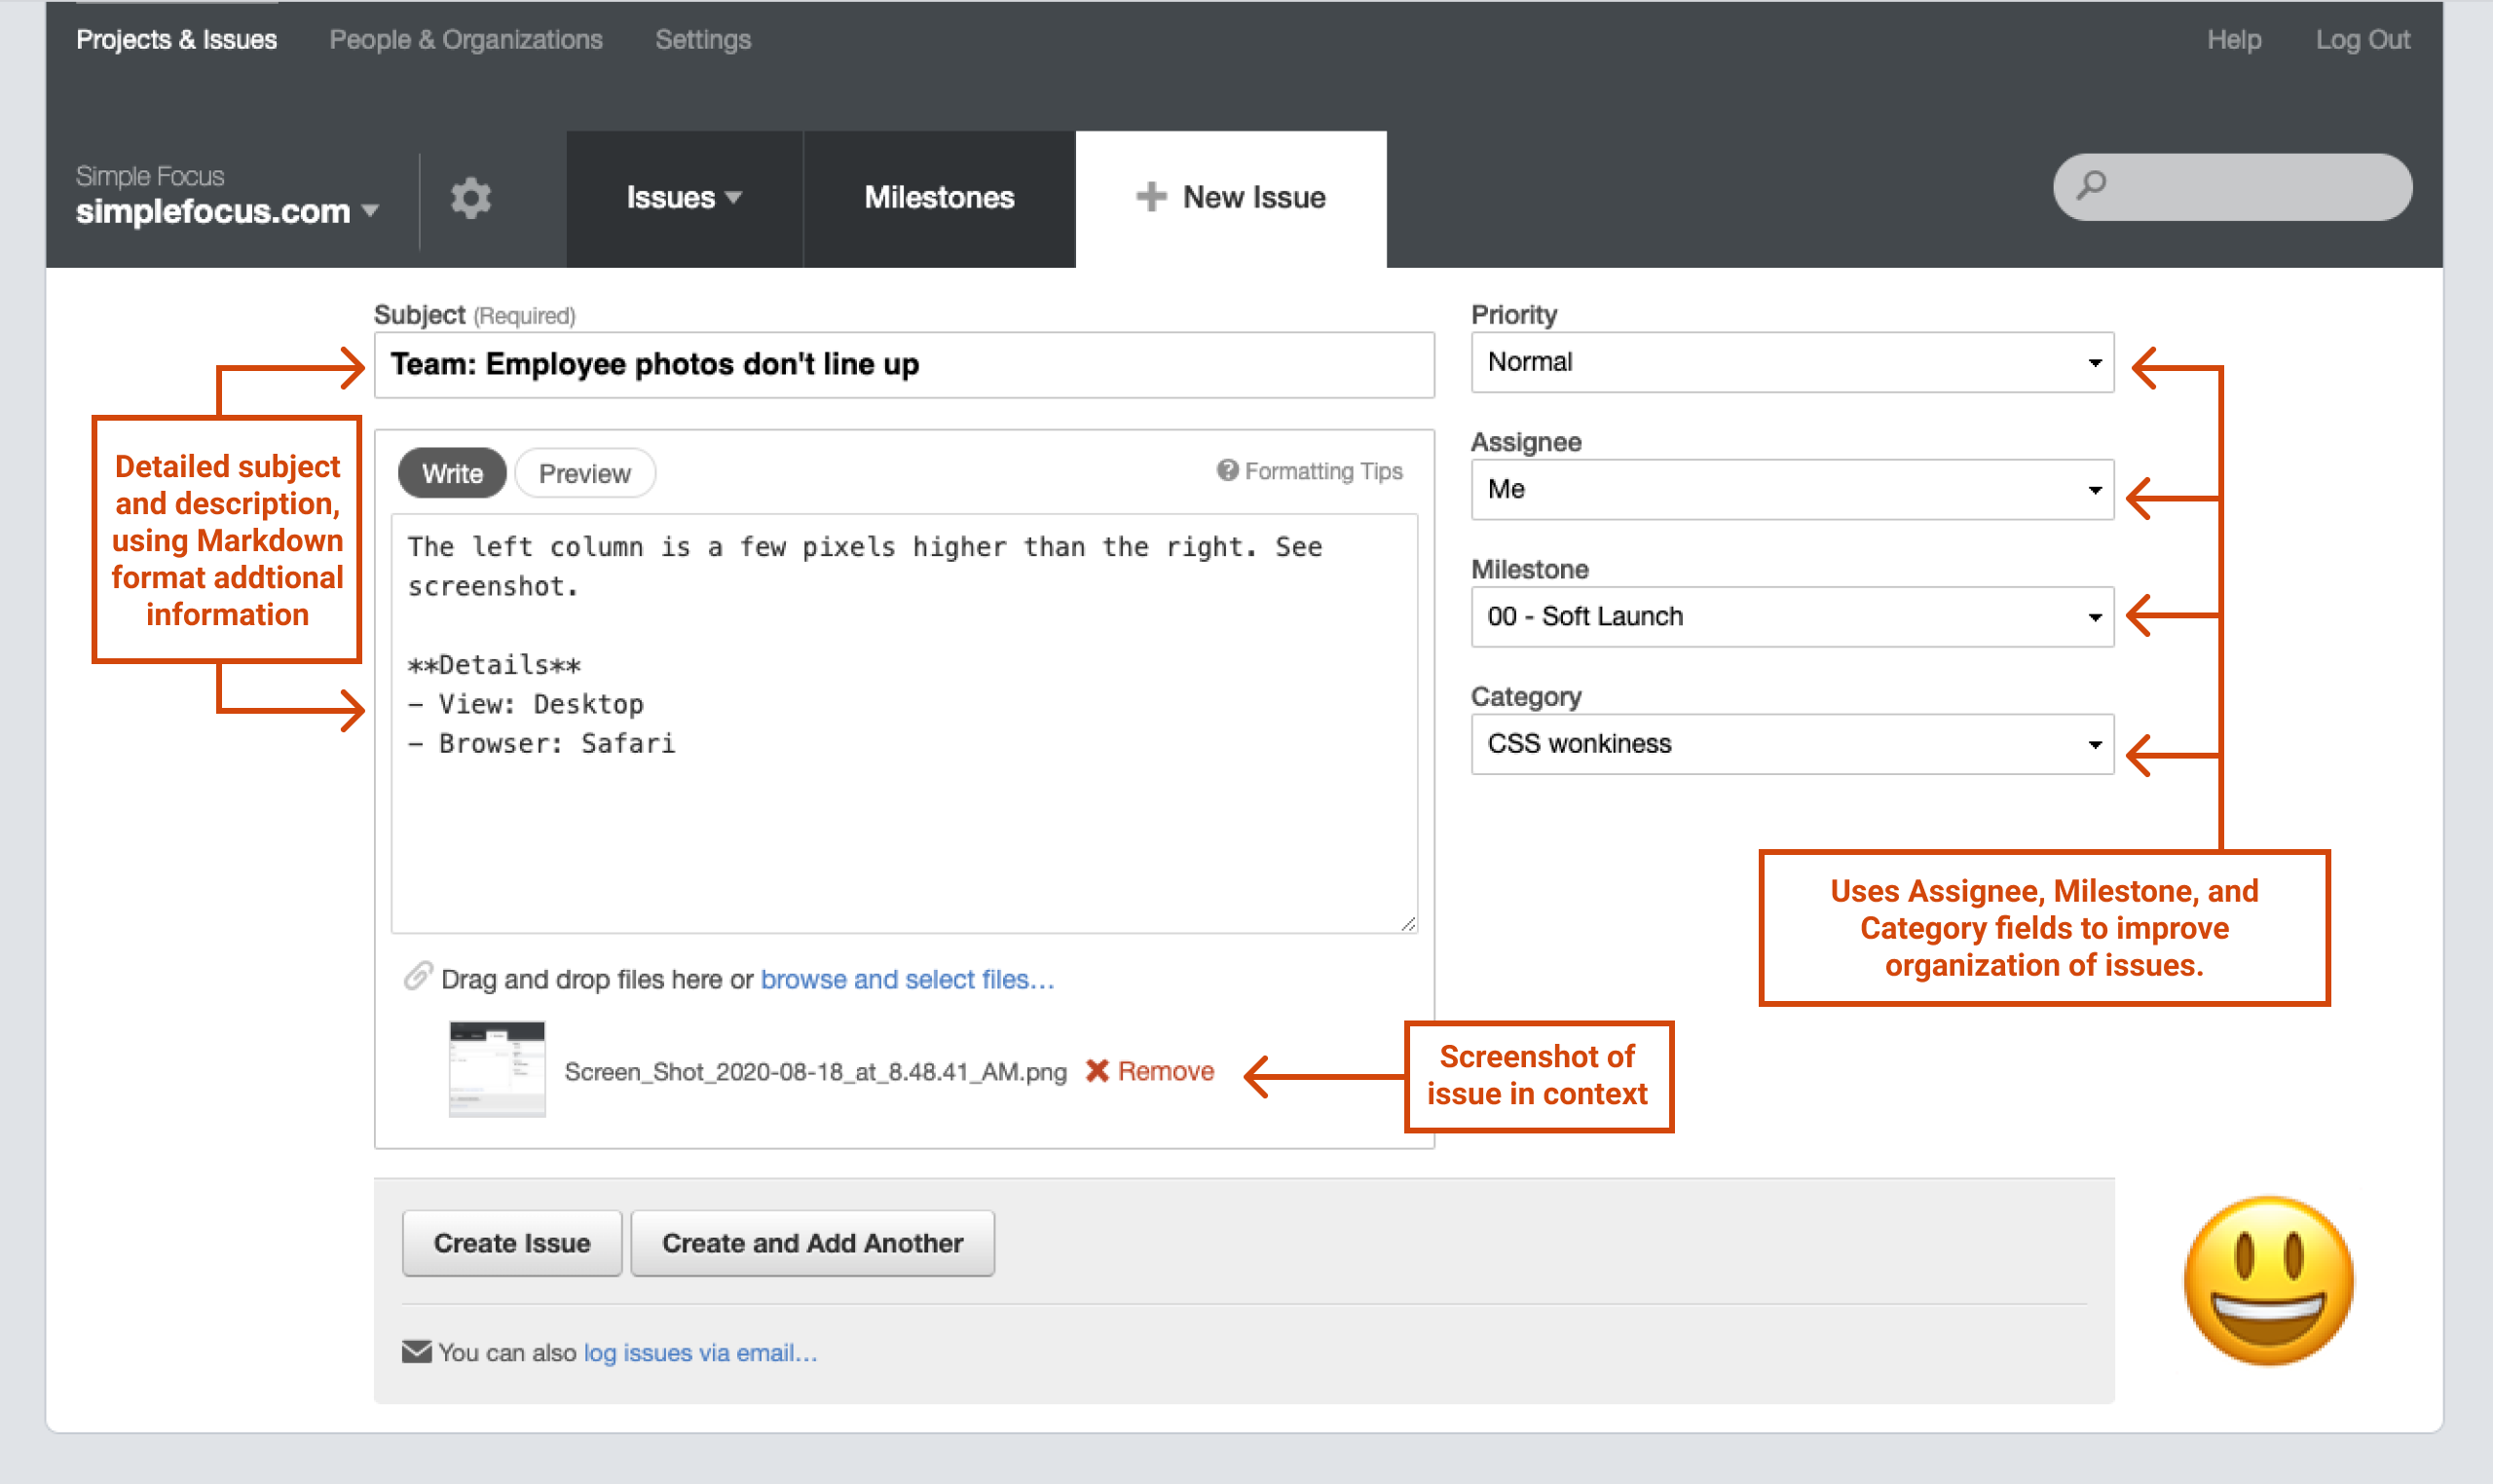
Notice how much easier it will be for a team member to understand how to hop right in and address the employed photo alignment issues because of the context provided?
7. Consider outsourcing additional QA tests before launch
Before you launch your product, consider getting some clean feedback from a new pair of eyes. You can outsource to another testing team for an additional round, or consider setting up some usability tests with your ideal consumers to ensure that your product has taken all of their needs into account.
CEO of Bharyang, a major IT company based out of Nepal, Riwaj Ghimire, says that in addition to his own team, he frequently outsources QA services depending on the project to maximize feedback. “After we have the product finished on the development side, we begin daily testing and rotate between several teams to ensure we find and fix as many bugs as possible.”
A QA process that works every time
An unclear QA process can do more than muddle the waters for your project. If you plan ahead and walk through your testing plan ahead of time, you’ll save yourself some headaches. And you’ll be able to avoid launch delays while keeping your clients happy.
“Your end goal is that your code does what you want it to do,” says Chopra. “Worry less about generic factors like testing coverage and rather design your QA and development process with the end-goal in mind.”